Friday, October 31, 2008

Mexican Baked Potatoes


Look how cute these are! They are like twice baked potatoes, Mexican style! Love it! While these were not "quick" (baked potatoes never are), they were REALLLY easy and very good. Because I use vegetarian fat-free refried beans, I don't think these are too unhealthy either. All in all, I would call these babies a success!
I used refried black beans this time, but I don't like the dark color it gave the inside, so if I were serving these to guests, I would probably use normal refried beans so that it was more of a brown and less of a burnt looking black. Then again, I always love the taste of black beans, so who knows, maybe I'll stick with it.

Oh, but about the vegetarian fat free refired beans? Come on, they are so much better for your arteries and still taste just as good. I feel fine eating them since the 2nd ingredient isnt "lard." Heeby Jeebies to that one.
I am entering this recipe into My legume love affair. Check out here and here for details if you are interested in entering.
Mexican Baked Potatoes
4 large russet potatoes, washed
3/4 cup vegetarian fat-free refried beans
2 scallions (white and green parts), thinly sliced
1 Tbsp taco seasoning
salt & pepper to taste
3/4 cup mild or medium salsa
1 cup shredded Mexican cheese
sour cream and/or guacamole (optional)

1. Preheat the oven to 450 degrees F. Prick the potatoes with a fork and bake in the center of the oven for 1 hour, or until tender. Reduce the heat to 375 degrees F and let the potatoes cool at room temperature for about 15 minutes before handling.
2. When the potatoes are cool enough to handle, cut in half lengthwise and scoop out the potato pulp, transferring to a small bowl and leaving a shell about 1/4 inch thick. Add the refried beans, scallions, taco seasoning, salt and pepper to the potato pulp; mash well to thoroughly blend. Stuff the mixture back into the potato halves and transfer to an ungreased baking sheet. (potatoes can be covered with plastic wrap and refrigerated for 24 hours before continuing)
3. Top each potato half with about 1 1/2 Tbsp of salsa. Bake in the center of the oven, about 15 minutes (about 20 minutes if they have been refrigerated), or until heated through. Sprinkle each half with 2 Tbsp of the cheese. Return to oven and bake until the cheese is melted, about 5 minutes. Serve at once, with the toppings (if using).

Monday, October 27, 2008

Penne with Butternut Squash Cream Sauce

I am so hungry right now. I was already hungry before I started typing because my lunch was tiny, but then add in that I am looking at pictures of this REALLY good dinner from last week and I am positively drooling. Please forgive me while I salivate at the screen. Last week I saw the recipe for pumpkin cream sauce on penne in Rachael Ray, but not liking pumpkin much I immediately switched to Butternut squash and never looked back. The nutty and almost sweet roasted butternut squash with the cream...oooh and cheese. So good! And, it was even better the next day because a lot of the sauce was absorbed by the pasta, so it was all flavored with the butternut squash. It was just very good and very rich and filling. And really not that bad for you (ok, I know it has cream and cheese, but still, all that squash!)

I am submitting this dish to Celebrate Autumn: AYE.
Penne with Butternut Squash Cream Sauce (Adapted from Rachael Ray)
1 lb penne or ziti pasta
2lb butternut squash
2 TBSP butter
1 onion, chopped
salt and pepper (crucial, do not skimp)
1 cup half and half
1/2 cup parmesan plus more to top
parsley
1. Preheat oven to 400. Cut squash in half lengthwise. Scoop out the seeds. Place cut side down on a roasting sheet and roast about 45 min until tender. When done, let cool slightly. Once cool enough to handle, remove any dark areas from the cut edge, then spoon the rest of the flesh into a bowl. Puree with your handy dandy imersion blender (or in a regular blender) until smooth.
2. In a large pot of boiling, salted water, cook the pasta until al dente. Drain, reserving 1/4 cup pasta cooking water.
3. Meanwhile, in another large pot or pan, melt the butter over medium-low heat. Add the onion and season with salt and pepper (remember, do not skimp!) ; cook, stirring, until softened, about 6 minutes. Stir in the squash and half and half and bring to a boil. Mix in the pasta and the reserved pasta cooking water. Stir in the parmesan; season with salt and pepper.
4. Serve. Top the pasta with the parsley and more parmesan.


Wednesday, October 8, 2008

Stuffed Shells

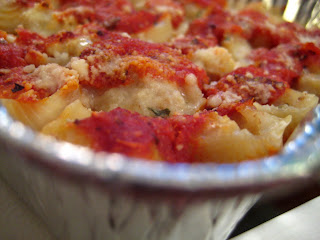
Now THAT'S what I call a frozen or TV dinner! Stuffed shells in a wine tomato sauce. Not only is it delicious, but this dinner was on my table in 20 minutes last night. Before school started I made a big batch of stuffed shells and froze all but one portion of them for easy school night dinners. And it worked out beautifully. These taste just as good out of the freezer as they do fresh!
I will admit, they certainly are not photogenic, but isn't taste what really matters? These babies have the taste down, but looks...well the first time I made them I was afraid they would taste horrible because the look is less than grand. I think the reason they look different is because I used ground chicken instead of beef and chicken is a much lighter color. It tasted just great, but maybe next time I would use ground turkey, just for appearances sake.
Also, you will note that I used regular size pasta shells, not jumbo shells. I did this because my tiny, city grocery store does not sell the jumbo shells and I was far too lazy to travel to get them. But, that being said, I think I will use the normal shells again, just because I love pasta and this upped the pasta to filler proportions. If you don't have time or want more meat to your pasta, bump it back up to jumbo shells, but whenever I have time I will certainly keep making it with these small ones
I am submitting this recipe to Monthly Blog Patrol: Sauces for the great tomato red wine sauce that you pour over top. I would gladly use it on any pasta!

Stuffed Shells (adapted from Blog Chef)
Ingredients:
1lb ground chicken (or perhaps turkey)
1 large onion (diced)
1 garlic clove (minced)
1 (8oz) bag shredded mozzarella cheese
½ cup Italian breadcrumbs
¼ cup fresh parsley (finely chopped)
1 egg (beaten)
1 (26 oz) jar of spaghetti sauce
1 (8 oz) can tomato sauce
½ cup grated parmesan cheese
1 box large pasta shells (I used the large, not the jumbo)
salt and pepper (to taste)
1/3 cup dry red wine

Cooking Instructions:

Step 1: Cook shells according to package directions. Meanwhile in a pan brown ground chicken, garlic and onion. Drain off any excess fat and let cool. Preheat the oven to 400 degrees.
Step 2: Combine chicken, mozzarella cheese, egg, breadcrumbs, parsley and season with salt and pepper.
Step 3: Mix spaghetti and tomato sauce in a medium bowl and pour 1/4 of it into the bottom of a 13×9 inch oven safe dish (I used about 5 "grilling pans" to make individual portions)
Step 4: Stuff the cooked and drained pasta shells with the meat mixture and place on top of the sauce in the pan. Add red wine to the remaining sauce, mix well, and pour over the top of the shells. Sprinkle with parmesan cheese.
Step 5: Bake in the oven for 20-25 minutes.

Note: If you are freezing, stop after step 4, wrap in 2 layers of aluminum foil, put in a ziploc freezer bag and freeze until ready to use. When ready to use, defrost in fridge the night before, then bake as directed.

Sunday, October 5, 2008

Mexican Stuffed Peppers


Man, I must be all about the stuffed peppers! Switching gears from Italian to Mexican this time though, for yet another meal that is friendly to a law student budget (aka cheap). I got this recipe from Thursday Night Smackdown. I foresee many other recipes coming from there thanks to the "cheap a** mondays." Good stuff, too. Check it out.
This recipe (if it can be called that thanks to its versatility and ease) was delicious! I made what was supposed to be 3 servings (one and a half peppers stuffed with rice-y goodness), but it was so good, I ended up making it only 2 servings (I was really hungry and could not resist the cheesy goodness!). Even after making the 3 servings, I had plenty of rice mix leftover which I popped in single serving size baggies in the freezer to be used on other, cheap eats nights.
This recipe will be the first one entered into my 3 new categories: cheap, easy and frozen. While the first 2 sound like a high school boy's ideal date, they are really categories many full grown boys are looking for in dinner. I was talking with the boy this weekend and he mentioned how he never knew which recipes he could pull off, so the "easy" section is for him. If it were 1950 and home-ec was still only taught to girls, I would call it the "boy capable food" section. But, welcome to the 2000s! The cheap category is pretty self explanatory and will hold the food I will make on weeks when the loans start running out. Finally, frozen will be the category of food that freezes well for quick meals later. Hope this helps!

Mexican Stuffed Peppers

serves 2 plus leftover rice stuffing for later

1 large green bell pepper, cored, seeded and halved
2 cups cooked yellow rice
2 tbsp. olive oil
1 medium yellow onion, diced
4 cloves garlic, diced
1 10 oz. can black beans, drained
1 10 oz can corn, drained
1/2 tsp. ground cumin
1/4 tsp. chili powder
1/4 tsp. ground black pepper
handful of cilantro, chopped
5 oz. shredded Mexican four cheese

sprinkling of taco seasoning

Pre-heat your oven to 375.

Put the cooked rice, 4 ounces of the cheese, and the cilantro into a large bowl. Set aside while you prepare the rest of the filling.

Add the olive oil to a medium skillet and heat over medium heat. Add the onions and saute until just turning golden, 6-7 minutes; add the garlic and cook for another minute. Add the beans, corn, cumin, chili powder and cook for a few minutes to combine the flavors. Check the seasoning and adjust the salt.

Add the bean mixture to the rice, cheese and cilantro and stir to combine.

Lay the pepper halves in a baking dish and heap with stuffing. Sprinkle remaining cheese over the top. Sprinkle with taco seasoning. Bake for 25-30 minutes, until peppers are crisp-tender. Turn on the broiler for the last few minutes of cooking to brown the cheese, if you like.


Put any leftover filling in single serving size ziplocs and freeze. When ready to use, defrost in the fridge overnight and fill peppers as directed and top with cheese and bake.