Tuesday, December 15, 2009

Fettuccine with Creamy Red Pepper-Feta Sauce

Ready for the shock of your (and my) life. The boy really liked this. He ate all of it. Why is this shocking? Let me count the ways:
1- red peppers. They are a vegetable. They are also the PRIMARY ingredient here. The boy doesn't eat many vegetables, including bell peppers. He picks around the tiny pepper bits in the Chicken Caesar Casserole. Yet he ate these
2- Feta. Turns out he loves the stuff. He who thought my Greek salad was weird (because it wasn't Caesar with Parmesan) loves feta now. This makes life- and Greek salad making- much easier
3- It was fettuccine. The boy likes angel hair/cappellini. I love fettuccine and hate angel hair. Yet again, the boy still liked this.
Clearly this was some good stuff. And, not terribly bad for you, even with the cheese. Mmmmm, feta cheese....
Fettuccine with Creamy Red Pepper-Feta Sauce
  • 2 tablespoons olive oil
  • 1 small onion, chopped
  • 2 to 3 garlic cloves, peeled and chopped
  • 1 (16-ounce) jar roasted red peppers, drained and chopped
  • 1/2 cup low-sodium chicken stock stock (can also use vegetable)
  • 1 cup crumbled feta cheese or a 6-ounce block
  • 1 pound whole-wheat fettuccine
  • Salt
  • Freshly ground black pepper
  • 2 tablespoons chopped fresh parsley leaves

DIRECTIONS

1. Heat the oil in a heavy skillet over medium-high heat. Saute onion and garlic until soft, about 10 minutes. Add roasted peppers and saute until heated through. Remove from heat and let cool slightly. Place mixture in the bowl of a food processor with stock and all but 2-4 tablespoons of the feta (recipe says 2, but I really like having more feta on top, so omit more now). Process until combined and smooth, about 30 seconds.

2. Cook pasta according to package directions. Drain, reserving 1/2 cup pasta water. Toss pasta with sauce (or as much sauce as you want. I don't think I added all the sauce), adding pasta water by the tablespoon, if needed. Sauce should cling nicely to pasta. Season with salt and pepper, to taste. Divide among pasta bowls. Sprinkle with parsley and remaining feta cheese.

Sunday, December 13, 2009

Pineapple Upside Down Cake


You know it is finals time when: I randomly decide to poke my head out of my study hole and post.

This summer some friends and I initiated a dinner club. Each month 1 of us would host a dinner, come up with a theme and assign menu items. This was the dessert for out Mexican themed night (more Cal-Mex, but I certainly did not mind!). I was terrified it wouldn't work out and I would be left with a 9x13 pan of ick and no dessert to bring.
Thankfully I was TERRIBLY wrong, and I had a 9x13 pan of deliciousness and a great dessert for my dinner club.Sadly, my dear friend and dinner club peer, Sam, is leaving for the Big Apple, so dinner club will likely fall to the way-side. If anyone in the No.VA area wants in to take her spot, let me know ;)

Pineapple Upside Down Cake
from laughingduckgardens.com
  • canola oil to grease the pan
  • 12 tablespoons (i.e. 1.5 sticks) of unsalted butter (not margarine), soften to room temperature, and divided into 9 T for the caramel/topping and 3 T for the batter
  • 1.5 cups brown sugar
  • 12pineapple rings - about 1-2 15-oz cans pineapple rings in juice (not in syrup)
  • 4oz (1/2 of 8 oz jar) jar maraschino cherries, pitted and stemmed
  • 1/2 cup + 1 Tablespoons of whole milk
  • Skimpy 1/2 cup canola oil
  • 1 teaspoons strong vanilla extract
  • 1.5 cups + 3 tablespoon of all purpose flour
  • 2 teaspoons baking powder
  • 3/4 teaspoon salt
  • Heaping 1 cup sugar
  • 3 eggs

Instructions:

1. Turn oven on to a temperature of 350 F

2. Oil the pan with a pastry brush (or your fingers) using up to 2 tablespoons of the canola oil. Make sure to get the corners and sides well. Do not be stingy as you want the cake to unmold easily. Roughly chop 9 tablespoons of butter and scatter at the bottom of pan. Put pan in oven while it’s preheating. Keep an eye on it, and take it out of the oven as soon as butter is melted. It should do so before the oven reaches 350 F. Put the remaining 3 tablespoons of butter in a very large bowl on the stove where it’s warm to help it soften.

3. Sprinkle the bottom of the pan with the brown sugar evenly, again making sure to reach all sides and corner. Lift the pineapple slices from the juice (reserve the juice) and arrange them in a grid pattern. Sprinkle 3 tablespoons of the pineapple juice over. Sprinkle 1TBSP of maraschino liquid from the jar over the pineapple. You could push one cherry in the center of each ring now, if you want, but they’ll look better if you do this after the cake has been baked.

4. In a bowl, combine milk, the skimpy 1/2 cup canola oil and vanilla. In another bowl, sift together flour, baking powder and salt.

5. In the very large bowl where you set it to soften, beat together the remaining 3 tablespoons of butter (which should be very soft by now) and the sugar until light and pale lemon colored. It will look “mealy”. Beat in the eggs, one by one, then add the milk mixture, and the flour mixture (1 cup at a time) beating well after each addition. Pour batter over the pineapple rings, smoothing it out as necessary. It may looks like there is no enough batter: there is!

6. Bake in the preheated oven until cake is golden and a toothpick or skewer comes out clean. I am not sure how long exactly, I believe about 40 min-1 hour ( I did not keep good track of time). It Will be about this color:

Remove from oven, let cool until you feel comfortable handling the pan.

7. Now comes the tricky part: inverting the cake. Position the cake inside a rimmed cookie sheet (rim facing up). Put another rimmed cookie sheet on top of the cake (rim facing down). The cake is now sandwiched between two rimmed cookie sheet. Clamp the two cookie sheets together and invert the cake quickly and decisively but carefully. Remove the pan from the cake carefully. If necessary, use a spatula to remove any stuck ring and put it back on the cake. Scrape any caramel from the pan and put it on the cake.

8. Push one cherry in the center of each ring.

9. Let cool and cut into squares, one for each ring


Tuesday, September 15, 2009

Pesto Chicken Packets

This summer the boy and I went camping with a friend from college and his friends. These have to have been some of the nicest, most patient people. You see, and this is embarrassing, I hadn't been camping since girl scouts. Clearly I had no clue what to expect or what to do, but these wonderful people helped me survive, and even enjoy, my first camping trip as a person over the age of 10.
Don't worry, I'm not here just to tell you about my trip, but also the food. I knew going into it that there would be roasted marshmallows and s'mores. And there were indeed marshmallows and s'mores galore. Loved it!
So perhaps those marshmallows were a tad too toasty, but you get the point.

The way we did food is we had a different couple make dinner for everyone each night. After a REALLLLLY long drive, the boy and I were welcomed to camp by bratwurst and steaks. The next night was our turn to cook. By "our turn" I mean "my turn"- but I wouldn't have it any other way.

I had made a Caesar-pesto pasta salad and snickerdoodles before we left home, so I only needed to make the main meal on site. To go with the pasta salad (which I will post next time I make it), I made Pesto Chicken Packets from Rachael Ray. Chicken, zucchini (and in my version squash), tomatoes, green onion and pesto baked or grilled in individual serving aluminum foil packets.I apologize, as good as these were, I just could not for the life of me get a good picture. The lighting as well as my hunger did not support a great photo shoot! You will just have to trust me that everyone liked it, or check out the professional picture on Rachael Ray's website.
***UPDATE: I have since made these for a friend and was able to get slightly better pictures. The aluminum foil is still not a great photography medium, but at least this time I had light and more time. See the pictures below. ALSO I have added comments to the recipe where I adjusted stuff***Pesto Chicken Packets
4 servings
  • Extra-virgin olive oil, for drizzling (TIP- do not use; the pesto will give off a fair amount of oil during cooking)
  • 4 skinless, boneless chicken breast cutlets
  • Salt and pepper
  • 1 cup pesto (don't use nearly this much)
  • 1 zucchini, thinly sliced
  • 1 yellow squash thinly sliced
  • 4 plum tomatoes, chopped (or about a pint of grape tomatoes halved)
  • 8 scallions, trimmed (and cut into 1/2- 1" sections)

Directions:

  1. Preheat a grill to medium or oven to 450. Cut four 12-inch-long sheets of heavy-duty foil. Drizzle 1 teaspoon (or no) olive oil into the center of each sheet.

  2. Season the chicken with salt and pepper. Lay 1 piece of chicken in the center of each sheet and spread (from 2 teaspoons to) 1 tablespoon pesto on top.

  3. Mound one-quarter of the zucchini, tomatoes and scallions over each chicken breast. Dollop 2 tablespoons (no more than 1tsp) pesto over each mound. Fold the foil over the chicken and vegetables; pinch the edges to seal.

  4. Cover and grill over indirect heat or bake the packets for 25 minutes. Remove from the grill or oven and open carefully.

  5. Serve with rice or pasta to absorb the extra juices. (also GREAT with garlic bread-put the tomato bits on the garlic bread and it is DELICIOUS)

Hostess Cupcake Cake- The Success


This one is digging back in the archives. The "Sam" in question has a March birthday. Yes, a little late. But, well worth it. This is the (in)famous hostess cupcake cake- but this year it stood!!
This year, I made a 3 layer cake instead of a 4 layer cake. I was also REALLLLLLY careful in how I made sure the cakes exited their pans. I sprayed the pans with a lot of pam and then tried coating them in a LOT of either flour or cocoa powder. You can see the difference between the cakes covered in cocoa and the coke covered in flour. I far prefer the appearance of the chocolate cakes coated in cocoa, the flour would be better for a vanilla cake. I also made sure to cool the cakes a good bit before taking them out of the pan and to keep them on COMPLETELY flat surfaces (meaning no dinner plates, etc).

I only removed the center of the middle cake, and I had already chosen the sturdiest looking cake as the middle one.

And it stood. And it was good. And we rejoiced.


For the recipe, see here. Multiply the cake recipe by 1.5 to make 3 round cakes. Fill with the vanilla filling, but use frosting or filling in between the layers (I did one of each). Go heavy on the frosting in between layers (for flavor and making sure it stays together).

Enjoy

Sunday, September 13, 2009

Black Bottom Cupcakes


I've made 2 versions of the black bottom cupcake and these were by far my favorite. The other was not nearly dark enough or chocolatey enough to balance the cream cheese center. These were perfect- as most things by David Lebovitz and Smitten Kitchen are. They were a soft, rich, sweet chocolate cupcake, balanced by a firm, tart cheese cake filling. Phenomenal.
My more recent attempt was while I did not have internet access, but did have a Rachael Ray magazine which featured a similar cupcake. I used her version, but, as I previously mentioned, was not impressed. The people I baked for still loved it, but I did not. What can I say? I'm picky.

Black-Bottom Cupcakes

Yield: approx 12 full-size cupcakes

For the filling:
8 ounces cream cheese, at room temperature
1/3 cup granulated sugar
1 large egg, at room temperature
2 ounces chocolate chips

For the cupcakes:
1 1/2 cups all-purpose flour
1 cup firmly packed light brown sugar
5 tablespoons cocoa powder
1 teaspoon baking soda
1/4 teaspoon salt
1 cup water
1/3 cup vegetable oil
1 tablespoon white or cider vinegar
1 teaspoon vanilla extract

Make the filling: Beat together the cream cheese, granulated sugar, and egg until smooth. Stir in the chocolate chips. Set aside.

Make the cupcakes:
1. Adjust the rack to the center of the oven and preheat to 350°F. Line the muffin tin with paper muffin cups.
2. In a medium bowl sift together the flour, brown sugar, cocoa powder, baking soda, and salt. In a separate bowl, mix together the water, oil, vinegar, and vanilla.
3. Make a well in the center of the dry ingredients and stir in the wet ingredients, stirring until just smooth.
4. Divide the batter among the muffin cups- about 1/2 way full. Spoon a few tablespoons of the filling into the center of each cupcake, dividing the filling evenly. This will fill the cups almost completely, but still leave some room to puff.
5. Bake for 25 minutes, or until the tops are slightly golden brown.

Chicken Caesar Casserole

Much like my Harlequin Chicken, this is one of those recipes that I kept putting off making. I felt like I wasn't in the mood, or it took too much time, or something, but it kept being put off. Finally I made it and I am glad I did. It was delicious. Last night I even had a huge craving for it! It was so good!!

Caesar Chicken Casserole

2-3 chicken breasts, cooked, cut into 1/2" to 1" pieces
1/2 cup bell pepper, chopped
1/2 cup green onions, chopped
1/3 cup light creamy caesar dressing
1/2 cup chicken broth
1 1/2 cups Mozzarella cheese, grated
1 12-oz package tubed pasta (such as penne), cooked and drained
1/2 cup croutons

Combine all ingredients but croutons. Pour into a 2 quart baking dish or about 5 small aluminum grill pans. Crush croutons and sprinkle on top. Allow to cool and freeze, or continue to next step.

From freezer: Thaw casserole. Bake in 350F preheated oven for 30 minutes or until topping is browned and casserole is bubbly

Saturday, September 12, 2009

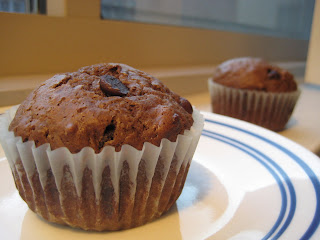
Chocolate Chocolate Chip Muffins

I am well aware that I fail as a regular blogger. I won't even dare to comment on how long it has been since my last post except to say that it has been too long. I hope that my next post comes far sooner. However can I make it up to you? How about some chocolate chocolate chip muffins?
I baked these during the school year when I somehow ended up with buttermilk in my fridge, and I needed a way to use some of it up. A google search revealed these little delights that satisfy a sweet tooth. But don't go claiming "they're muffins! They must be healthy and a great breakfast!" because, well, they are in no way healthy. But, when it comes to chocolate, healthy is not something I personally look for. I cared more about the fact that they were moist and soft with a slight crunch at the top and they fulfilled my chocolate craving perfectly.
I ended up bringing these to my classmates, and it seems my positive review was universal. One girl in my section declined a muffin for her diet's sake, then, after hearing the raves from the others sitting next to her, she retracted her refusal and gobbled down one of the scrumptious muffins. These are diet-breaking good.
Chocolate Chocolate Chip Muffins

INGREDIENTS
1 bag, chocolate chips, divided
1/3 cup unsalted butter
3/4 cup buttermilk
1/2 cup white sugar
1 egg
1 1/2 teaspoons vanilla extract
1 2/3 cups all-purpose flour
1 teaspoon baking soda
1/2 teaspoon salt

DIRECTIONS
Preheat the oven to 400 degrees F. Line 12 muffin cups with papers.
In a small saucepan over low heat, melt 1/2 of the chocolate together with the butter. Let stand until cooled, about 10 minutes.
Lightly beat the egg. In a small bowl, stir together the chocolate-butter mixture with the buttermilk, sugar, egg, and vanilla, until blended well.
In a large bowl, stir together flour, soda, and salt. Make a hole in the center of the dry ingredients, pour in the chocolate mixture, and stir until just combined. Stir in the remaining chocolate chips. Spoon the batter into the lined muffin cups.
Bake at 400 degrees F for 20-25 minutes or until a toothpick inserted in the center of a muffin comes out clean. Remove muffin tin from oven and let stand at least 5 minutes, before removing the muffins and letting them cool on a wire rack.

*Note- recipe says these can be frozen, though I have not yet tried it. They were all gone within a day!

Tuesday, January 27, 2009

Caramel Brownies


WOW! These were some of THE BEST brownies I have ever had!! I don't know how to praise them enough. Dense, chocolatey brownies filled with gooey caramel and a layer of melted chocolate chips. Ya, I went there.
It was adorable. The first time I made these, I brought them to a dinner party at a friend's place. One of my friends asked "how did you get the caramel to go around and under some of the brownie." I gently explained that it was not a feat of gravity or magic, but that you don't pour all the brownie in at first. His surprise made the recipe all the better. Oh, and he loved the brownie! As did the host who kept a large part of the pan to enjoy after I left.

Speaking of dinner parties, All Things Edible is holding a housewarming party, and I am bringing these scrumptious bites. Hope everyone has a sweet tooth!

Caramel Brownies
  • 1 pkg. (18.25 oz.) chocolate cake mix
  • 1 cup Evaporated Milk (a little less than a can), divided
  • 1/2 cup (1 stick) butter or margarine, melted
  • 35 (1-10oz. pkg.) soft/chewy caramels, unwrapped
  • 2 cups (1-12oz. pkg.) chocolate chips
Directions:
PREHEAT oven to 350° F.
COMBINE cake mix, butter and 2/3 cup evaporated milk (batter will be thick). Spread half of batter into ungreased 13 x 9-inch baking pan.
BAKE for 15 minutes.
HEAT caramels and remaining evaporated milk in small saucepan over low heat, stirring constantly, until caramels are melted. Sprinkle chocolate chips over brownie; drizzle with caramel mixture.
DROP remaining batter by heaping teaspoon over caramel mixture. (I found it looked best if you shaped large spoonfuls of dough into flat circles in your hand, then laid the circles over the caramel. Created a less craggy surface. Compare 1st and 2nd pictures at top)
BAKE for 25 to 30 minutes or until center is set. Cool in pan on wire rack. Cuts easiest if set overnight or in the fridge for a bit.

Friday, January 9, 2009

Couscous Lentil Dinner


OK, so it isn't photogenic, but it was good and super quick and inexpensive. And tasty. And good for you... Wow, sounds pretty good to me

I am entering this couscous lentil dinner into Legume Love Affair.

Couscous Lentil Dinner

1 tbsp oil

½ cup onion, chopped

3 cups water

2 1/2 cups vegetable cocktail juice

2 cups brown lentils

2 bay leaves

2 cups couscous

¼ cup Parmesan cheese

2 tsp basil

1 (14 oz) can diced tomatoes

1. Saute oil and onion in large pot until onion is tender

2. Add water, juice, lentils and bay leaves. Bring to boil. Reduce heat to low and simmer about 25-30 minutes until lentils are soft but not mushy. Remove from heat and discard bay leaf

3. Add couscous, cheese, basil and tomatoes to pot and mix in. Cover and let stand about 5 minutes until couscous is soft. Fluff with fork and serve

Thursday, January 8, 2009

Baked Pesto Chicken

"I think this is the best thing you have ever made"- The boy
Enough said? If not, let me just tell you it is phenomenal! Chicken, basil pesto, fresh tomatoes and mozzarella. So good.

If you take the chicken and put it in a ziploc bag, you can pour the pesto in and then freeze it. Then, just defrost it overnight, put it on the baking sheet and continue as directed.
Baked Pesto Chicken
  • 4 boneless skinless chicken cutlets
  • 1/2 cup basil pesto
  • 2-3 plum tomatoes, sliced
  • 1/2 cup shredded mozzarella cheese
  1. Preheat oven to 400 degrees F.
  2. Line baking sheet with foil.
  3. Place chicken on pan and spoon pesto over it. Once all chicken cutlets have pesto on them, smooth the pesto all over the surface (do this afterward so that you don't contaminate the pesto)
  4. Bake for 20 minutes or until chicken is no longer pink in center.
  5. Remove from oven; top with tomatoes and cheese.
  6. Bake for an additional 3-5 minutes or until cheese is melted.

I am entering this pesto chicken into Foodie Films: Italian.