Saturday, December 15, 2007

Banana Bread

Told you I would be back! Between last night's belated Hanukkah dinner and this afternoon's family gathering at the boy's, I have squished in using my squished bananas! From very over ripe bananas I have made a delicious and tender, sweet but not overly sweet banana bread
I have made this banana bread a ton of times and would not change a thing. One thing to be aware of is the baking time. I have had it done in as little as 20 min and sometimes it takes as long as an hour. I think it depends on how big your bananas were. No matter how long it takes to bake, it tastes great.
Banana Bread
3 large bananas, mashed
1 egg
1 stick butter, melted
1 1/2 cups flour
1 cup sugar
1 tsp salt
1 tsp baking soda

Preheat oven to 350. Mix all ingredients together using an electric mixer. Trust me, from personal experience, it does not work with a whisk or spoon. When well combined, pour into greased 9x13 pan. Bake for 20-60 min (30 min is average) until knife inserted in middle comes out clean.

Friday, December 14, 2007

A REAL SCHOOL!

My babies I am back! SUPER exciting news: I shall have a life! I am done all but one of my finals AND (even better) have been admitted to the University of Maryland School of Law! (Amy does happy dance) Now I hopefully won't have to work as hard next semester, meaning more time for my lovely bloggers! Hazah

I have not had time to think about blogging as of late so there are no pics, but I will just give an idea of some things we have had recently so that I can remember to make them again!

From Best of the Best:
Frenched Green Beans and Linguine (mediocre; not worth the work)
Caramel, Banana and Chocolate Cake (Tasted good but had horrible texture; fell apart, yet soggy inside and har outside)
Peanut Butter, Chocolate Chip Cookies (VERY GOOD- REPEAT)

From AllRecipes:
Roasted Red Pepper Cheese Dip (http://allrecipes.com/Recipe/Aprils-Roasted-Red-Pepper-Cheese-Ball/Detail.aspx) (Fabulous, the office devoured it and even the roomie who doesn't like cheese eats it)
Baguettes (http://allrecipes.com/Recipe/French-Baguettes/Detail.aspx) (Took longer than expected but worth it; boy said I should make these all the time)
Stuffed Peppers with Turkey and Vegetables (http://allrecipes.com/Recipe/Stuffed-Peppers-with-Turkey-and-Vegetables/Detail.aspx) (Great and so healthy! Used Squash instead of zuchini and added garlic. Very Good)

From My Roommate's Family:
Picante Chicken:
Saute 6 chicken tenders in olive oil until about 3/4 of the way done. Cover in Picante sauce (we used medium, but I'd change to mild). Bring to boil. Cover and let boil about 5 minutes or so. Cover in cheese (Monterey Jack preferable) and serve with rice.

I am making banana bread tomorrow so I will post on that then.

Again, sorry for my disappearance, but I should be back now.

Monday, November 19, 2007

Chocolate Peanut Butter Tart

Can anything with chocolate be bad? Honestly, you have to work pretty hard to make something with chocolate into anything less than delicious. Sure you could make chocolate covered brussel sprouts or even chocolate mousse filled pumpkins (I really don't like pumpkin), but overall, chocolate makes anything better.

Including breakfast. I know. Chocolate for breakfast?! But sometimes I just can't help myself. A coworker brought in bagels and pastries from Au Bon Pain this morning, and what do I choose? The healthy bagel? Nope. Chocolate covered and filled croissant. And this is by no means a first! On my European adventure this past summer, I had chocolate for breakfast 3 times in under 2 weeks! 1st, I had a chocolate covered fluffy pastry (sort of like a croissant) the first morning in Barcelona. 2 days later we had churros and chocolate for breakfast! So rich and delicious (and so bad for me!) If you are ever in Barcelona, stop by this little bakery in Plaza P for churros and chocolate and the best start to a morning you could imagine (such a sugar/fried food rush!). Then, on our first day in Rome, we were exhausted, lost, dirty and pissy. All of that was erased by the glory of a croissant/eclair mix. It was kind of a crossaint filled with cream and dipped in chocolate. It wasn't exactly a croissant, but that is the closest equivalent I know! So good, it made the horrible train ride disapear!

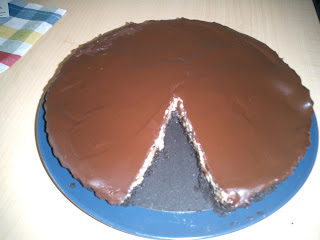
Anyway, point being, chocolate is my friend any time of day. So, it really shouldn't come as a surprise when I say I had a slice or 2 of this Chocolate Peanut Butter Tart for breakfast! LOL! I made this for one of my friend's birthdays. He has wanted to make a giant Reeses cup for ages, so I made this tart to imitate it for him. Chocolate graham cracker base, peanut better filling, chocolate coating. Yum-O.I made a test batch (the one I consumed) and a real tart to give as a gift. Through the test batch I learned to change the following:
1) increase the amount of crust ingredients slightly. I did not have enough crust material to come up the sides the first time, so I changed the crumbs to 1 1/4 cups and increased the other parts slightly as well
2)increase the peanut butter to almost 2/3 cup. I felt that only 1/2 cup was not peanut buttery enough for me, though my room mates were OK with it
3)for the glaze, I increased the chocolate while keeping the butter the same. Really, I want my topping chocolatey, not butter/fatty
4)take the tart out of the pan after chilling the filling layer, before covering in chocolate. If you add chocolate while it is in the pan it will rip the chocolate when you remove itThis made for a DELICIOUS 2nd tart. Birthday boy was so surprised and I think he really enjoyed it. Apparently it was 1/2 gone by the end of the night I gave it to him!

As you will note, this dessert is a TART! My first tart under my blog which is named "TART reform." Took me long enough, right? Well this timing is made even better by the Waiter There is Something in My...Topless Tart blog event. Thanks to Cook Sister for hosting.
Chocolate Peanut Butter Tart

Cookie Crust
1-1 1/4 cup finely ground chocolate wafers or chocolate graham crackers (I used chocolate teddy grahams ground in a food processor, because crushing them in a zip top bag did not get me small enough pieces)
2 tbsp granulated sugar
1 1/2 ounces (3 tbsp) unsalted butter, melted

Preheat oven to 350F. In a medium bowl, mix cookie crumbs and sugar with a fork until well mixed. Drizzle butter and mix until crumbs are moistened. Press crumbs evenly into a 9 1/2 - inch fluted tart pan with a removable bottom. Bake crust for about 10 minutes until fragrant. Let crust cool completely before filling.

Peanut Butter Filling
1 1/2 cups whole milk
1/4 tsp salt
3 large egg yolks
1/3 cup firmly packed light brown sugar
4 tsp all purpose flour
1/2 - 2/3 cup creamy peanut butter
1/2 tsp vanilla extract
1 cookie crust, baked & cooled (see recipe above)

Glaze
3-6 ounces semi or bittersweet chocolate, finely chopped
2 ounces (4 tbsp) unsalted butter, cut into small pieces
1 tbsp light corn syrup

To make the filling:
In a medium saucepan, bring milk and salt to a simmer. In a medium bowl, whisk together egg yolks, brown sugar and flour. Whisking constantly, slowly ladle in half of the hot milk over the egg mixture. Pour mixture back into the remaining milk in the pan. Cook over medium heat, whisking constantly, until mixture comes to a boil and thickens, about 4 minutes. Continue to cook, still whisking constantly, for 1 more minute. Remove pan from heat and whisk in peanut butter and vanilla.

Pour hot filling into cooled crust and spread evenly. Carefully press a piece of plastic wrap directly onto the surface of the filling (to prevent a skin from forming). Refrigerate for at least 2 hours before glazing.To make the glaze and finish the tart:
Melt chocolate and butter in a double boiler over medium heat. Stir corn syrup into the melted mixture until smooth. Remove plastic from chilled tart and remove tart from pan. Carefully pour the hot glaze over the filling and spread evenly to cover the filling. Refrigerate the tart for 30 minutes before serving.

Wednesday, November 7, 2007

Double Decker Confetti Brownies

Avoiding homework and law school applications has recently meant not avoiding an increased weight. Basically I have been baking in order to avoid...life. This is not going to end well.

Sometime last week I did just that. I broke out the "Treasury of Home Baking" and made the double decker confetti brownies. Brownie layer. Blondie layer. M&M layer. For fun, I put a peanut butter chip layer between the brownie and blondie, but will leave it out next time as I wasn't a fan of the texture or taste combo. Otherwise it's perfect. Everyone enjoyed my procrastination.

One warning: Putting down the brownie layer is hard. Very tough to even out, but it is possible. The blondie can also be hard, but going a little light on the extra flour helps.
Double Decker Confetti Brownies

Ingredients

1 1/2 sticks Butter, softened
1 c Granulated sugar
1 c Firmly packed brown sugar
3 Large eggs
1 tsp Vanilla extract
2 1/2 cups All purpose flour, divided
2 1/2 tsps Baking powder
1/2 tsp Salt
1/3 cup Unsweetened cocoa powder
1TBSP Butter, melted
3/4 cup M&Ms

Preparation

Preheat oven to 350. Lightly grease 13x9x2 pan; set aside.

In large bowl, cream 3/4 cup butter and sugars until light and fluffy; beat in eggs and vanilla.

In medium bowl, combine 2 1/4 cups flour, baking powder, and salt; blend into creamed mixture. Divide batter in half.

Blend together cocoa powder and melted butter; stir into one half on the dough.

Spread cocoa dough evenly into prepared baking pan.

Stir remaining 1/4 cup flour into remaining dough; spread evenly over cocoa dough in pan. Sprinkle with M&Ms.

Bake 25-30 minutes or until edges start to pull away from sides of pan. Cool completely.

Monday, November 5, 2007

1/2 way there and WAHOOOO

1st: sorry, but life is really in the way of blogging. school work is full swing, as is law school applications. Add in work and you have an absentee blogger.

2nd: I am now completely done 3 law school applications (MD, FLA Coastal and UVA) and done the application part, but not scholarship part for 2 others (Georgetown and American). Basically 5 done. Depending on who I hear back from when, I intend to do between 8 and 11 apps total. I'm about 1/2 way done then! Hazah!...Still 3-6 left to do though.

3rd: WAHOO! No matter what I am going to school somewhere! I got my 1st acceptance letter this weekend! Florida coastal school of law accepted me and offered me a $20,000 per year scholarship!! WOOT! It's just a backup school, but I think this is a great start. I'm in somewhere! Weeee!!!

Sunday, October 28, 2007

Vegetarian Chili with Butternut Squash

I HATE about you, Mr. Butternut Squash. You mock me. You say I cannot cut through your hard exterior, even with my largest bread knife or sharpest paring knife. Yes, you are so evil. Yet, I managed to cut you (after about 40 minutes of work). Thankfully this recipe was worth it.
While making this meal, roomie and I kept saying "this had better be the best freaking chili ever." In a way it was, in a way it wasn't. It was phenomenally delicious, but I don't know if it was chili. It was a soup? A stew? I don't know, but it was very hearty and very good. Oh, and bonus, it's good for you too. Lots of veggies in this one and little fat. Fantastic meal and it will be repeated.
We ended up using the top 1/2 of a 4 lb squash (because we didn't feel like going through the work of cutting the rest). I'd say it was the perfect amount, so a 2 lb squash would be fine too. Because the squash was REALLY hard, we thought it would be flavorless, but once cooked it was great. You just have to cut it first.

HOW TO CUT THE ANNOYING SQUASH
1)peel the part you want to use: we used a large vegetable peeler.
2)cut into large block (i found a large bread knife best, but even that was hard)
3)create small cubes using a small knife.
Tips for next time: Try using a frozen boxed squash instead if fresh. I can't guarantee it will be as good because i used the real thing, but it would sure be easier. This is a very versatile recipe, so feel free to play around with it. I did! Things I changed are noted on the recipe.
Vegetarian Chili with Butternut Squash
Ingredients:
4 tsp. olive oil
1 medium butternut squash peeled and cut into 3/4 inch pieces
3 medium carrots cut into 1/4 inch pieces (I used cut up 1 or 2 handfuls of baby carrots)
1 large onion, chopped
2 tbsp chili powder (I used less)
2 garlic gloves, chopped
2 cans (14 1/2 ounces) plum tomatoes (I used diced tomatoes)
3 jalapeno chilis seeded and minced (I left these out)
1 cup reduced-sodium vegetable broth (I used chicken and used a little extra)
1 tbsp sugar
1/2 tsp salt
2 cans black soybeans/black beans rinsed and drained (I used 1 can black beans)
1 cup lightly packed cilantro leaves (omitted)
plain nonfat yogurt (optional, I used sour cream)
1. In nonstick 5-quart pot, heat 2 tsp oil over medium high heat until hot. Add squash and cook, stirring occasionally until golden, 8-10 min. Transfer to bowl and set aside.
2. In same pan heat remaining 2 tsp oil. Add carrots and onion and cook stirring occasionally until golden about 10 min. Stir in chili powder and garlic, cook, stirring, 1 minute longer.
3. Add tomatoes with their juice, jalapenos, broth, sugar and salt. Heat to boiling over medium-high heat, stirring to break up tomatoes with side of spoon. Stir in beans and squash. Heat to boiling over medium-high heat. Reduce heat to low, cover and simmer until squash is tender, about 30 minutes (because I cooked the squash a little extra at the begining, I only cooked about 15 min here)4. Remove from heat, stir in cilantro. Serve chili with yogurt, if you like.
Prep Time: 30 minutes Cook: 50 minutes Makes: about 10 cups or 6 servings

Sunday, October 21, 2007

Marble Pound Cake with Chocolate Glaze

"I wanna bake. What should I bake?" Famous last words before the room mates all gain 5 pounds. The answer this Weds was something from my new book "Best of the Best Volume 10." It has the best recipes from the best cookbooks of the year and one of the books is Tish Boyle's "The Cake Book." So, I decided to do her Rich Marble Pound Cake with Chocolate Glaze.

Like I said. Pounds gained. Was totally worth it though! It was phenomenal straight from the oven. This slice was served piping hot to myself and 2 room mates. In 20 seconds it looked like this.
And it only lasted that long because I had a coughing fit after laughing at some highly inappropriate noises we all made in response to the cake. Yes, it was just that good.I had to change the glaze because I did not have bittersweet chocolate, only semisweet. To up the bitter, cocoa flavor I added a little cocoa powder to the mix and added a little extra cream to compensate for the extra dry ingredients. It worked, but it clearly needed more of the glaze. I improvised by adding a little cream and a little cocoa to leftovers from a canned frosting. It worked but wasn't the best. Next time I think I will double the glaze recipe. The original (printed below) or the semisweet with cocoa version should both work fine.
The only other things I changed were the number of layers and the flour. I was having so much trouble dividing and getting even layers that I did 2 layers of each instead of 3. Instead of cake flour I used all purpose. No one had any idea and certainly no one minded.
Marble Pound Cake with Chocolate Glaze
3 cups cake flour (I used AP)
2 tsp baking powder
1/2 tsp salt
2 1/2 cups sugar, divided
1/2 cup cocoa powder
6 TBSP water
1 1/2 cups (3 sticks) butter, softened
1 1/2 tsp vanilla
5 eggs
1/2 cup milk
bittersweet chocolate glaze (recipe follows)

1. Position rack in center of oven and preheat to 325F. Grease a 10 inch bundt pan and dust with flour
2. mix flour, baking powder and salt and set aside
3. whisk together 1/2 cup sugar, cocoa powder and water until smooth. Set aside.
4. Beat butter until very creamy (2 min). Gradually beat in remaining 2 cups sugar. Increase speed until well blended and light (4 min). Beat in vanilla then eggs, one at a time.
5. At low speed add dry ingredients in 3 additions, alternating w/ the milk in 2 additions.
6. Add 3 cups of batter to the cocoa mixture and stir until blended. Spoon 1/3 of remaining plain batter into pan in an even layer. Cover with 1/3 of chocolate batter. Repeat, ending with chocolate.
7. Bake 60-70 min
8. Once cooled, place the cake on a rack on top of a lined baking sheet. Slowly pour glaze over the top of the cake, letting it drip down the sides
Bittersweet Chocolate Glaze
3oz bittersweet chocolate, chopped
1/3 cup heavy cream
1/2 tsp vanilla

1. Bring the cream to a boil. Remove from heat and add chocolate, stirring until melted and smooth. Stir in vanilla.

Thursday, October 18, 2007

Broccoli and Cheddar Soup


I went broccoli picking. Yes, broccoli picking. It was so much fun, yet so odd! I never knew how broccoli grew before. I came home with so much fresh broccoli. I used what I could, then chopped and froze the rest. This recipe was an attempt to use up some of that fresh broccoli.
It was delicious. I recommend serving with fresh bread and a salad or a baked potato. I also would recommend topping with extra cheddar cheese in the bowl to make it extra cheesy and make it look pretty. Oh, and the SHARP cheddar is critical, as is the pepper. Overall, very good.

Broccoli Cheddar Soup

INGREDIENTS

  • 1/4 cup butter
  • 1/2 onion, cut into medium dice
  • 2 teaspoons garlic chopped
  • 1/2 teaspoon pepper (I think I used extra)
  • 1/4 tsp nutmeg
  • 1 (16 ounce) package frozen chopped broccoli
  • 1 quart chicken broth
  • 1/2 cup all-purpose flour
  • 1 1/2 cups whole or 2% milk
  • salt to taste
  • 8 ounces shredded sharp Cheddar cheese
DIRECTIONS:
1. Melt butter over medium heat in a stockpot. Cook onion in butter until softened. Add garlic, nutmeg and pepper; cook for 1 minute then stir in broccoli, and stir in chicken broth. Bring to a boil and simmer until broccoli is tender, 10 to 15 minutes.
2. Meanwhile whisk flour into milk until dissolved. Stir into soup stirring frequently until thickened. Reduce heat, and stir in cheese until melted and heated through.
3. Season with salt to taste.

Monday, October 8, 2007

Chicken and Onion Stoup


I love federal holidays. As today was Columbus day, I didn't have work. Happy dance! So, what did I do? Well, I studied, I read about the environmental impact statement of a power plant in California, and I watched the Rachael Ray show. Very fun and gave me inspiration for tonights meal. She made a roast beef au jus stoup (soup/stew). It had crusty bread on the bottom, then roast beef, then onion soup. Yum, right? Well, we aren't meat eaters around these parts, so I made it with chicken instead and chicken broth in the soup instead of beef. Was very good. Didn't look pretty, but that's comfort food. Only taste matters here.The recipe needs a little work on the assembly, but with some tweaks would be delicious. The caramelized onion flavor was phenomenal, and I never thought I could make onion soup, but I just pleasantly surprised myself. The bread was good, but it got soggy, so next time I will not put it underneath the soup.

Tips for next time: Make the layers: soup, chicken, toast. And keep some toast on the side to add as you finish the first bread or it gets soggy.Chicken and Onion Stoup
  • 1 tablespoon extra-virgin olive oil (EVOO)
  • 2 tablespoons unsalted butter
  • 3 large onions, thinly sliced
  • 2 garlic cloves, finely chopped
  • Salt and freshly ground black pepper
  • sprinkling of thyme
  • 1 bay leaf
  • 1/2 cup white wine
  • 2 1/2 cups chicken stock
  • 1/2 loaf crusty bread, torn into bite-size pieces and toasted
  • 3 chicken cutlets
  • italian dressing

Preparation

  1. Marinate chicken in italian dressing and heat a foreman grill.
  2. Heat a deep pot over medium to medium-high heat. Add EVOO, about one turn of the pan, and butter to the pot. Add the onions to the pot as you slice them and the chopped garlic. Season with salt and pepper then add thyme and a bay leaf. Cook the onions for 20-25 minutes, stirring frequently, until tender, sweet and deep caramel-colored. If the onions are burning in spots before browning all over, add a splash of water and stir every now and then, scraping the bottom of the pot.

  3. Once the onions are tender and brown, add the white wine and scrape up all the brown bits from the bottom of the pot. Add the stock and cover the pot to bring the soup up to a quick boil.

  4. Grill chicken until cooked through. Let rest a moment then slice into small bite size pieces.
  5. Place a few chunks of the toasted bread into each of four deep soup bowls or crocks and top the toast with a handful of the chicken. Once the soup reaches a boil, remove the bay leaf and ladle into bowls to cover the chicken (note,put bread in AFTER soup)

Monday, October 1, 2007

Ice Cream Sandwich Cake

I have odd friends. As I've mentioned, the boy refuses to eat any veggie except broccoli. The roomies drink gallons and gallons of milk a day. Run-Girl-Run hates anything with lime. And another one of my friends, Emily, doesn't like many flavors. All she likes is apple juice, vanilla ice cream, m&ms, brownies and plain pasta. That's it. Well, Emily, Happy Birthday, this one was for you.

It was delicious. An uphill battle, but a worthwhile foe.
Dear god this was good. I was so nervous it was going to be horrible. First the ice cream didn't make a nice ring and it smooshed out the sides. Then the M&Ms bled color down the ice cream and slipped. Then the brownie was rock solid when we tried to cut it. But it was all worth it. Everyone seemed to enjoy it, especcially with an extra scoop of ice cream. SO tasty though. And even the birthday girl who doesn't like flavor or combining ingredients enjoyed it! Success!

Tips: do not touch, fiddle with or so much as look at the ice cream in the brownies until it has been in the freezer for 2 hours. It tends to slide out. Deal with it now and clean it up once frozen or else it will keep sliding out. This reduced the amount of ice cream INSIDE mine. Oh, and don't try to put candles in it. It's really hard because it is frozen.

(Below: the struggle for candles, along with other desserts and the gals)
Brownie Ice Cream Sandwich Cake
1-2 bags m&ms
2 boxes brownie mix and eggs, oil and water called for on boxes for cake like brownies
1/2 gallon vanilla ice cream

What to do:
Prepare 2 round cake pans by greasing them.
Prepare brownie mix according to the package directions. Pour into the pans and top one of the pans with up to 1 bag m&ms
Bake according to the package directions. Remove and cool completely.
Run a small paring knife around the edges of each brownie, loosening it from the pan.
Invert layer without m&ms onto a cookie sheet, and spread vanilla ice cream on top, coming right to the edge (you can slightly soften the ice cream first).
Place the other brownie layer on top, m&m side up, and press gently to secure. Place in the freezer until firm, about 2 hours (this is crucial. do not mess with it or open freezer or touch it for about 2 hours).
Just before serving, press remaining M&M’S into the ice cream. (I put them in the day before hand, leading to the color drip, so unless you want it to look tie died, wait until the end)

Thursday, September 27, 2007

Chocolate Caramel Pie

I know. I fail as a blogger. Well life has been a little too fast-paced here at chez tart reform. Between school work, work, student judiciary and law school applications, I feel privileged to be getting any sleep. That said, I made this baby spur of the moment a few weeks ago. Roomie needed some heavy cream for her coffee, but the mini-mart nearby only had some huge size
that would surely not fit in her coffee, even if it was going to last a month. So, what to do with a lot of extra heavy cream? Well, the Daring Bakers did do a Milk Chocolate and Caramel Torte that required heavy cream...

And so it was decided. I would have to improvise...a lot. It really was NOT the daring bakers' recipe, but it sure was good.

Worth the effort? I dunno. But it used up some of the excess cream and was really impressive. "Yes, we made caramel from scratch using the dry method...not a big deal."

Tips for next time: Check pantry and ingredients list before starting next time. Heavy cream is different from whipping cream and we only had 1 of the 2, so I used whipped cream... Yaaa.. Oh well, It worked.
Spur of the Moment, Improvised Caramel and Chocolate Pie

Ingredients:
  • 1 chocolate pie crust
  • 1 ½ cups granulated sugar
  • 1 cup heavy cream
  • ¼ cup butter
  • 2 whole eggs
  • 1 egg yolk
  • 2 ½ tablespoons flour
  • 1/2 can whipped cream
  • 1 cup melting chocolate
1. Preheat oven to 325 °F (160 °C).

2. In a saucepan, caramelize 1 cup granulated sugar using the dry method until it turns a golden caramel color. Stir constantly using a non-plastic utensil. This will Take a while.3. Incorporate the heavy cream then add butter. Mix thoroughly. (At this stage, your caramel will likely seize up. Just keep stirring for a long time over low heat and it will smooth out) Set aside to cool.

4. In a mixing bowl, beat the whole eggs with the extra egg yolk, then incorporate the flour.5. Pour this into the cream-caramel mixture and mix thoroughly.

6. Spread it out in the pie shell and bake for about 25 minutes. Remove from oven and allow to cool.7. Prepare the milk chocolate mousse: Melt the milk chocolate and fold in the whipped cream. Cool slightly.8. Pour the chocolate mousse over the cooled caramel mixture, smoothing it with a spatula or pipe it on with a pastry bag. Chill for one hour in the refrigerator.