Monday, July 30, 2007

Smores Cupcakes

My kitchen mojo came back this weekend and I took full advantage of it! I baked malted milk cupcakes with fudge frosting, honeyed peach french toast, berries and peaches angel food cake and, these gems, smores cupcakes. Two versions of cupcakes in one weekend may seem like a lot, but when you just got your mini cupcake holders, aka mini nut and party cups, in the mail, you too would feel compelled to make cupcakes. I am so happy that I have the cooking bug back, because these were delicious. I say were because all the ones I brought to work are already gone. Glad I left some at home! 
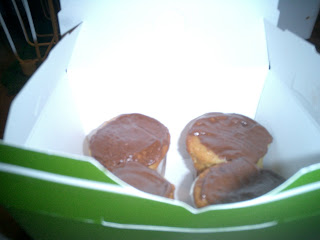
I also made up a little box with 4 of the mini-cupcakes for the boy to take with him. He's going to be gone for about a week (so expect some adventurous dinner ideas!)

In addition to having made these goodies, I also got a baking gift. I was feeling really lousy Sunday (let’s just say I had a little too much fun Saturday night), so the boy ran errands and entertained himself in the afternoon. He said that on his trip to Borders, he saw something he couldn’t resist getting me. I hate when he spends money on me, but it did really brighten my porcelain-god worshipping day. The gift was 2 little books: one on cookies and bars, the other on muffins. Since I lack self rising flour and the boy doesn’t like fruity muffins, I didn’t use it last night, but trust me I will.

Instead I made the smores cupcakes. I used the graham cracker cupcake recipe from vanilla and garlic’s post about key lime pie cupcakes. I then frosted with the chocolate glaze from the terry’s chocolate orange cake, but replaced the orange juice with about 4 tablespoons marshmallow fluff. Voila. Graham Cracker Cupcakes with Chocolate Marshmallow Glaze- AKA Smores Cupcakes.

Tips for next time: do NOT overfill the cupcake holders. I left space at the top of mine yet the majority still overflowed. Those were not pretty, but they still tasted good, so after breaking off the dough avalanches, I still frosted them and brought them to work. Some made it without overflow, though! I may make these as full size next time, but make more frosting to cover them.

After having 2 of the mini cupcakes, one of my coworkers asked for the recipe. Below is exactly what I sent to her (without the pics).
Graham Cupcakes
Makes 12-14 cupcakes / 350 F oven
What You’ll Need...
1/2 cup of butter, room temperature
1 cup of sugar
3 eggs, room temperature
1 cup of milk
1 cup of flour
1 1/2 cups of graham cracker crumbs
1 teaspoon of baking soda
1 teaspoon of baking powder
1/8 teaspoon of salt

What You’ll Do...
1) Beat the butter for about 30 seconds until well creamed. Add the sugar and mix for 3 minutes using a paddle attachment until light and fluffy.
2) Add the eggs, one at a time, being sure to beat for 30 seconds for each egg.
3) Place graham crackers in a food processor or in a plastic bag and beat the crud out of them until it's been ground into small crumbs and powder.
4) Sift together the flour, graham cracker crumbs, baking soda and powder, and salt. Add about 1/4 of the mixture to the butter mixture, then add some of the milk. Continue to add the ingredients in a dry-wet-dry method, ending with the dry. Continue to mix until just combined.
5) Scoop into cupcake papers and bake for 15-18 minutes in a 350 F oven or until a cake tester comes out clean.

Notes: Made 35 mini cupcakes, baked for about 12 min. Do not overfill as these really poofed up and overflowed for me.

Chocolate Marshmallow Glaze
1 cup semisweet chocolate, chopped

3 tbsp unsalted butter

1 tbsp light corn syrup

3-4 TBSP marshmallow fluff

Combine chocolate, butter and corn syrup in a small saucepan. Stir over low heat until well combined about 2-3 minute. Remove from heat and stir in marshmallow fluff. Glaze your cooled cupcakes.

Notes: This only allows for a light covering of the cupcakes. If you like a lot of frosting, multiply it by 1 ½

(Green) Red Bell Pepper Soup (AKA My Mojo, Baby, Pt 2)

This is a follow-up to the last post, referencing my lack of kitchen mojo. I am happy to report that since this incident, I have gotten my mojo back and have made some tasty delights which will be written about later.

The lovely picture above, as well as the mystery picture from last week are of a red bell pepper soup that I decided to make with green peppers. Ya, definitely changed the look of the dish. On Smitten Kitchen’s page, the dish is a luscious red, much like a tomato soup. You just want to dive in head-first and swim in the rich, deep red liquid. Mine, looks like the goo from ghost busters. I was surprised it didn’t start dancing when I sang to it. Note to self…AGAIN…follow instructions. This one may taste ok, but that color is not acceptable. If I had only used the slightly more expensive red peppers, I would have a good soup. As is, it tastes decent enough, but, because of the color, I don’t know if I can eat it. It is all in storage containers in my freezer waiting for St Patty’s day, I think!

Besides the color, my lack of mojo was apparent with the ingredient “1/4 cup dry white wine.” I could not, for the life of me, get the bottle open. It still sits on my counter with a shredded cork, mocking me and my inability to open it. And it is supposedly a decent wine too! I don’t know what to do?! Should I break it open or just throw it out? So sad and pathetic. 
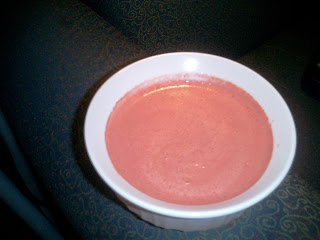
As for the soup, I halved the recipe so that I didn’t waste 12 peppers if it wasn’t good. I am quite glad about this fact since I can’t get the green good into my mouth. Below is the full recipe as it appears on Smitten Kitchen’s blog. My notes are in parentheses.

Tips for next time: There won’t be a next time for me,just because of the color and expense of the peppers, but if you would like to make it, use good RED bell peppers. I just think following the instructions would fix it right up.


Red Pepper Soup (New York Times 9/21/05 )
Total time: 45 minutes
2 tablespoons olive oil

3¼ cup sliced onions

3 large cloves garlic, crushed

¼ cup dry white wine (I used cooking sherry since it was already open)

12 large red bell peppers, cut in 1-inch pieces (I used green. Do not use green. Use red!)

2 cups no-salt-added chicken or vegetable stock or broth

2 tablespoons chopped fresh thyme (Could not find it at the farmers market or the store- is it a winter thing?- so I used basil)

¼ to ½ teaspoon hot red pepper flakes

Salt and white pepper

Crème fraîche for garnish

Thyme sprigs for garnish.


1. Put oil in large pot. Add onion when oil is hot. Cook onions until they begin to soften and take on color.

Add garlic and cook another minute. Add wine and cook down quickly, until about 1 tablespoon is left.
2. Add peppers, stock, thyme and red pepper flakes. Season to taste with salt and pepper. Cover and simmer until peppers are tender, about 30 minutes. 3. In food processor or blender, purée mixture in batches until smooth. Adjust seasonings.4. Cover and chill overnight or for as long as 2 days or freeze (whisk well before serving if thawed). Can also be served warm.
5. Serve in demitasse cups or soup bowls, topped with a dab of crème fraîche and a tiny sprig of thyme.

Friday, July 27, 2007

Donut Muffins (AKA My Mojo, Baby)

I lost my mojo, baby. Where did my kitchen mojo go? It is swimming with the fishes somewhere in New Jersey for all that I know. All I know is that it hasn't been in my kitchen as of late. 1st there were the margarita and daiquiri cookies that were so-so. Then the chilled cherry soup was a little on the tart side and while I was able to make it better with chocolate, it still needed more “umph.” Then last night, 2 more kitchen “blah”s.

Of course, the one thing I made phenomenally this week, I don’t have pictures or a recipe for. I made a weeknight classic, mooch, a few nights ago, but since I was cooking and eating with the boy, I didn’t measure or take pictures, as he doesn’t like me spending quality us time or eating time using the camera. As he put it “since when does my girl take pictures of food?” Ok, I’ll give him that, I usually just want to eat the food. But mooch is a delicious combination of shell pasta with meat sauce so that the shells often fill with the pieces of meat (in this case a combination of turkey and ground beef). I also added small pieces of mozzarella and garlic and topped with parmesan. It is great and I will eventually post on it. So, I have some cooking goodness left in me. Just not last night.

Last night we had Chinese food delivered, so no dinner disaster. But I had a ton of ingredients that I specifically bought for a new recipe for this week, and they were going to go bad if I waited too long, so I went back and made that dish. It turned out like this.
Is it the green goblin? No, it is my interpretation of what is supposedly a great recipe. I will write about it either this weekend or Monday, but major brownie points to anyone who can guess what it is. As I saw that this was not going to turn out to be an appetizing dish, I KNEW I was having a bum cooking/baking time. But, I had already promised the boy and his room mates muffins. So I was back into the kitchen for yet another try.

The guys decided they wanted donut muffins, a recipe I saw on a blog earlier that day (I won’t note the blog here because I am less than thrilled with the recipe and I do not want to be hurtful to anyone).

I got out all the ingredients and noticed, “Hey, I didn’t pull out any leaveners.” No baking soda, no baking powder, nothing. I just assumed the recipe was correct and that the egg would puff the muffins up a bit. I am now almost positive that the person just forgot to list the leavener he or she used. Ya, MINOR detail, right?
I mixed the muffins, then poured them into 12 muffin tins greased with pam. I then baked. What did I see while they baked? This.
Ya, no puffy muffiny-ness at all. Solid, non-rising dough mass. Not at all yummy. I felt like banging my head on a wall. The kitchen curse had continued. I took them out of the oven and got the muffin weights out of their pans. I used a silicone pastry brush to cover the top and part of the sides with butter, then dipped them in cinnamon sugar. This made the weights seem much more edible. Still, I couldn’t eat 3 bites of one without feeling sick.
I took them over to the boy and as he lead me to his apartment I explained about the lack of leavener and the fact that they would be better for liftting to build upper body strength and that they may taste best if you cut off the bottom and just ate the top half (less weight and more butter and sugar). He took one and gave another one to each of his room mates. Their reactions “YUM! OH these are good! Just what I wanted!” WHAT!? WHAT!? Where did this come from? These things were kind of nasty, yet they loved them? Do I have that weird of taste? I just left the muffins there and told the guys to go at it, I’d pick up the plate the next day.

So, while my kitchen mojo wasn’t fully restored, it wasn’t as badly bruised as I thought. Lesson learned, even if you don’t like what you made, someone else very well may love it, so give it away. I am very hesitant, but I will be back in the kitchen soon, I swear!

Tips for next time: I wouldn’t make these again. If you want to, I would switch the whole wheat back to AP flour. I would add a leavener to the dry ingredients.
Donut Muffins
1 cup All Purpose flour
1/2 cup whole wheat flour
1/2 teaspoon salt
1/2 teaspoon cinnamon
1/4 teaspoon nutmeg
1/4 cup oil
2/3 cup sugar
1 egg
3/4 cups milk
Topping:
1/2 cup butter, melted
3/4 cup sugar
1 teaspoon cinnamon (mix with the sugar)
Preheat to 350 degrees F. In a bowl combine the flours, salt, cinnamon, and nutmeg. In a separate bowl combine the oil, sugar, egg, and milk. Add the liquids to the dry ingredients and stir until just mixed. Pour into standard size muffin tin and bake for 20-25 minutes. Turn the muffins out of tins. While still warm, dip the muffin tops in the melted butter and then in the cinnamon sugar mixture.

Thursday, July 26, 2007

Terry's Chocolate Orange Cupcakes

You know what I love about the food blogging community? The willingness to share recipes. There are people out there who could make a lot of money selling cookbooks or opening a bakeshop with their recipes, yet they freely post them for all to try. And try them I do.

Tuesday was our monthly birthday party at work, and while all the food was covered, I felt like making another cake to add to the buffet. For the recipe, I turned to alpine berry’s Swiss orange chip cupcakes. Good decision! These things were absolutely delicious! They didn’t store too well (by far better the night I made them than the next night, but still good even then). Oh, but MAN were they good straight out of the oven! Slightly warm orange cupcakes with a warm chocolate ganache. I kept trying to describe the flavor to the boy as “it tastes just like that chocolate orange you get at Christmas time and you whack it on a table!” He had no clue what I was talking about. After a google search for “chocolate orange” I showed him that I was referring to the typically British Terry’s Chocolate Orange. I now have a burning desire to rename the cake the Terry’s Chocolate Orange cake.

Anyway, the cake. It is supposed to make 15 cupcakes, which is equal to an 8” cake and 3 cupcakes. Since I wanted to bring a cake to work I poured the batter in the cake pan first, and then went to pour the cupcakes. I must have put too little in the cake pan as I had enough batter for 6 cupcakes, and the cake did turn out a little thin. Those cupcakes, however, have disappeared! I had one as soon as I frosted it (and wanted to propose marriage to the cupcake right then!!) then I gave one to the boy. His response “you are taking the cake to work? Don’t! Give it to me!” This is surely a cake that will be repeated over and over again, and if I can just have it fresh out of the oven, I would say this is likely my favorite cake ever. THAT’S A BIG DEAL! Hint: TRY THIS!

Tips and Changes for next time: just make cupcakes. Try mini cupcakes too! The chips sank to the bottom, so I would mix them with the dry ingredients next time.

In other news, I have been named a Rocking Girl Blogger by Run-Girl-Run. Thank you so much! I now get to tag 5 darling gals who I read daily.
Smitten Kitchen-Every time I open her page I want to drool. Then Smile and laugh. There are great pictures of the food as well as stories to keep you entertained.
Taste and Tell- She has created a lovely site with phenomenal recipes you have seen and will continue to see here
Cream Puffs in Venice- The first food blog I really enjoyed! B-e-a-utiful.
Cupcake my Love-I just started reading, but am already planning to make a few of her lovely creations
Cupcake Project- Best idea ever! She has volunteered to make cupcakes for her friends’ wedding, so she is spending the time between now and the New Years Eve wedding trying to find the perfect cakes. We all benefit as she critiques any possible changes and lets us know what her friends thought.

Now what you care about. The cupcakes that I said may be my favorite. Swiss Orange Chocolate Chip Cupcakes
(makes 15 cupcakes)

1 1/2 cups all-purpose flour
1/4 tsp baking powder
1/4 tsp baking soda
1/4 tsp salt
4 oz (1 stick) unsalted butter, at room temp.
1 cup granulated sugar
2 tbsp grated orange zest (I used all of the zest from one large orange)
2 extra-large eggs, at room temp. (mine were not at room temp)
1/4 cup freshly squeezed orange juice
3 oz buttermilk, at room temp. (used the old trick of milk + lemon juice=buttermilk) (3 oz is a little over a third of a cup, fyi)
1 tsp vanilla extract
1 cup mini chocolate chips (used chopped chocolate baking pieces)

Preheat oven to 350 degrees F.
Sift together the flour, baking powder, baking soda, and salt. Set aside dry ingredients. Combine orange juice, buttermilk, and vanilla extract in a small Pyrex measuring cup. Set aside.
In the bowl of a stand mixer, cream the butter and sugar on medium speed until light and fluffy. Beat in the orange zest. Then add the eggs, 1 at a time. Scrape down the sides of the bowl.
Add one-third of the dry ingredients and mix just until incorporated. Mix in half of the buttermilk mixture. Repeat with flour, buttermilk, and flour. Mix in the chocolate chips.
Fill 15 lined muffin cups ¾ full (I did an 8” cake and 6 cupcakes, but would recommend just cupcakes). Bake for 20-25 minutes (barely needed 20 minutes). Cool cupcakes in the muffin pans for 10 minutes. Then carefully remove the cupcakes from the pan and cool completely

Chocolate Glaze

1 cup semisweet chocolate, chopped
3 tbsp unsalted butter
2 tbsp light corn syrup
½ tsp vanilla extract (I wanted to up the orange flavor so I used orange juice instead. LOVED it!)

Combine chocolate, butter and corn syrup in a small saucepan. Stir over low heat until well combined about 2-3 minute. Remove from heat and stir in vanilla extract (/orange juice). Glaze your cooled cupcakes

Wednesday, July 25, 2007

Cocktail Cookies

Sorry for having waited so long between the Oreo post and the Cherry Soup Post. I have a reason though! I was in Vegas! My brother had his bachelor party and his fiancée had her bachelorette party, then the next night the guys and girls got together. Everyone had a blast! What did we do, you ask? Sorry, but “what happens in Vegas stays in Vegas.” That is, unless you are Miss Spears and you elope. That has a tendency of following you home. Thankfully, no one eloped this go-round!

Anyway, I wanted to bring some goodies to the girls so that if we came back hungry after a night of fun, we’d have something to nibble on. But what to make for a bachelorette party snack? Cocktail cookies of course! After seeing smitten kitchen’s post on her margarita cookies I decided to make a batch of them and then alter the recipe and make strawberry daiquiri cookies. Great idea, right? Sadly, my execution was off. I became one of those people who completely changes a recipe and yet expects it to come out just as good. While they were still edible and the daiquiri cookies were even pretty darn good, I’d say that my changes royally buggered this recipe.

I think the only way in which I can explain why this recipe may be good but my changes not will be to give you smitten kitchen’s recipe along with my changes in brackets. Pink brackets for strawberry, green for margarita.

Tips and notes: Tip #1: follow directions! While they both were edible, neither was great and only the daiquiri was good. #2: do not use coarse salt as it isolates the salt in a few areas and either you get no salt or you get too much. #3: these get better with time. The day I baked them I tried one and was really disgusted, the next day it was edible and by the time I brought them to work 3 days later they were kind of good. I won’t be trying these again, but if anyone wants to, feel free, just for goodness sake, follow the directions!
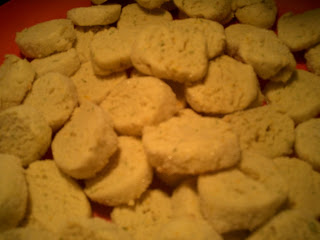
Margarita Cookies and Strawberry Daiquiri Cookies

2 sticks unsalted butter, at room temperature [for both I used margarine]
2/3 cup confectioners’ sugar, sifted
2 large egg yolks, at room temperature
Pinch of salt
2 teaspoons tequila [ended up using a little more since I couldn’t taste it at first] [used a little under a tablespoon of rum and a tablespoon of strawberry daiquiri syrup]
Grated zest of 2 limes [omitted]
Grate zest of half an orange [omitted]
2 cups all-purpose flour

Coating:
Approximately 1/2 cup clear sanding or other coarse sugar [used regular sugar]
2 teaspoons flaky Maldon sea salt* [used ¾ teaspoon of coarse sea salt, then realized it would have a lot of salt on just a few cookies, so I tried to crush it into smaller pieces] [omitted]

1. Put the butter in the bowl of a mixer fitted with the paddle attachment and beat at medium speed until it is smooth. Add the sifted confectioners’ sugar and beat again until the mixture is smooth and silky. Beat in 1 of the egg yolks, followed by the salt, tequila [/rum and daiquiri mix], grated lime and orange zest. Reduce the mixer speed to low and add the flour, beating just until it disappears. It is better to underbeat than overbeat at this point; if the flour isn’t fully incorporated, that’s OK—just blend in whatever remaining flour needs blending with a rubber spatula. Turn the dough out onto a counter, gather it into a ball, and divide it in half. Wrap each piece of dough in plastic wrap and refrigerate for about 30 minutes [I’d say mine were in anywhere from 15-45 min each].

2. Working on a smooth surface, form each piece of dough into a log that is about 1 to 1 1/4 inches thick. (Get the thickness right, and the length you end up with will be fine.) Wrap the logs in plastic and chill for 2 hours [mine were in anywhere from 20min-1hour. Ya, I wanted to go to bed at that point]. (The dough can be wrapped airtight and kept refrigerated for up to 3 days or stored in the freezer for up to 1 month.)

3. Position the racks to divide the oven into thirds and preheat the oven to 350°F (180°C). Line two baking sheets with parchment paper.

4. While the oven is preheating, work on the sugar coating: Whisk the remaining egg yolk in a small bowl until it is smooth and liquid enough to use as a glaze. Mix the coarse sugar and flaky salt well and spread the mixture out on a piece of wax paper. Remove the logs of dough from the refrigerator, unwrap them, and brush them lightly with a little egg yolk. Roll the logs in the sugar, pressing the sugar/salt mixture gently to get it to stick if necessary, then, using a sharp slender knife, slice each log into cookies about 1/4 inch thick. Place the cookies on the lined baking sheets, leaving about 1/2 inch space between them.

5. Bake the cookies for 12 to 14 minutes, or until they are set but not browned. (It’s fine if the yolk-brushed edges brown a smidgen.) Transfer the cookies to cooling racks to cool to room temperature.
Keeping: Packed airtight, the cookies will keep for about 5 days at room temperature. Because the sugar coating will melt, these cookies are not suitable for freezing.

* If you should choose to use regular table salt and not Maldon, use less! Much less. Probably half or less. Because Maldon has such volume, the equivalent amount of a finer salt would be much more pungent.

Tuesday, July 24, 2007

Chilled Cherry Soup

I am sooo excited. There are just 3 weeks between me and a cruise to an island paradise! Three weeks and then I will be laying on deck, watching the waves go by. Three weeks and I will be snorkeling with the boy in Mexico. Three weeks and I will be treated and fed like a princess. This last aspect may be my favorite part of any cruise.

For those of you who have never cruised, do. You become so relaxed because everything is taken care of for you. You want a towel? Soon you will have one folded into a swan. You want food? Here, have a 6 course meal with at least 3 choices for each course. I’m telling you, it is so hard to readjust to real-life afterwards. You have to cook, clean and think about issues beyond whether you want the shrimp cocktail or duck confit as your appetizer.

This dish is a prelude to my tropical vacation on the seas. As I just mentioned, there are many choices of what to eat on a cruise, but my favorites are the chilled fruit soups. Sometimes they are as a soup course, other times as a dessert. I made this chilled cherry soup as a dessert.

This is my first entry into Sugar High Fridays. The theme was tropical sweets. Because it is what I have while cruising, chilled fruit soups say tropical to me. I chose cherry just out of practicality, because I had 2 cups of frozen tart cherries from when I went fruit picking.

Tips and comments- It ended up a little tart, so I sprinkled chopped semisweet chocolate on top. That fixed it right up! I love the combination of chocolate and cherries, so perhaps next time I would blend some chocolate into the soup, then also top with chocolate shavings.
Chilled Cherry Soup
1. In a blender, combine 1 cup cold tart cherries (mine were halved, frozen cherries, defrosted) with ½ a cup orange juice until smooth. (Would also add chocolate during this step next time)
2. Add a dash of chili powder, and cinnamon and a few drops of lemon juice. Combine.
3. Pour into a bowl. Take a spoonful of raspberry syrup and make a design (I tried a flower by making a circle and using a skewer to drag 4 points to the middle, as well as a heart). If you don’t like your design, stir the syrup into the soup and try again. 4) Chop or shave chocolate and sprinkle on top.

Tuesday, July 17, 2007

Oreos

I am on sugar overload. I can’t take anymore. Give me soup, give me chicken, give me veggies. I have had too much sugar and no longer crave it. At lunch today I was unable to eat a whole vanilla snack pack. It was too sweet. I ate a few bites and tossed it. How have I gotten to this good-for-my-health but rather depressing point? Well, the day after I baked the snickerdoodles, I made home-made oreos. I AM DONE.

After seeing this lovely post on smitten kitchen’s website, I had to try them. They turned out splendidly. As the comments at the bottom of the recipe show, a lot of people got fluffier cookies, myself included. I didn’t care, and neither did the boy nor his room mates nor my coworkers. All devoured them. Tips and changes for next time: try to make these a day before you really want them because the flavor and texture seem to be better after being kept a day in an airtight container. They become less hard (original oreo like) and become like very solid chocolate chip cookies. I would also try to make mine thinner by pressing under a glass or something. Oh, and be sure to stick to the teaspoon size, because they expand dramatically! Other ideas would be to make the filling into other flavors like the oreo company does. I would say peanut butter would be best as it would cut the sweetness a little (my one complaint was that the solid filling required a lot of sugar), but you could also do mint, chocolate or possibly even a strawberry cream!
Conclusion: definitely worth a try! Very good and nostalgic. Needs some tweaking to make the filling less sweet and the cookies the right size, but already good and will only get better with more tries. I got 16 sandwiches out of my dough and had extra filling left over.
Homemade Oreos (from Retro Desserts by Wayne Brachman)
Makes 25 to 30 sandwich cookies (no it doesn't)

For the chocolate wafers:

1¼ cups all-purpose flour
½ cup unsweetened Dutch process cocoa
1 teaspoon baking soda
¼ teaspoon baking powder
¼ teaspoon salt
1 to 1½ cups sugar (I used one cup at the advice of smitten kitchen because I didn’t want both the cookie and the filling to be too sweet. This was definitely the right choice, anything more would be overwhelming. If you do nit make the filling, feel free to add more)
½ cup plus 2 tablespoons (1¼ sticks) room-temperature, unsalted butter
1 large egg

For the filling:

¼ cup (½ stick) room-temperature, unsalted butter
¼ cup vegetable shortening
2 cups sifted confectioners’ sugar
2 teaspoons vanilla extract

1. Set two racks in the middle of the oven. Preheat to 375 degrees.
2. In a food processor, or bowl of an electric mixer, thoroughly mix the flour, cocoa, baking soda and powder, salt, and sugar. While pulsing, or on low speed, add the butter, and then the egg. Continue processing or mixing until dough comes together in a mass. (It looks like it won't be possible with this little amount of liquid but it does, in fact, eventually come together)
3. Take rounded teaspoons (not tablespoons) of batter and place on a parchment paper-lined baking sheet approximately 2 inches apart. With moistened hands, slightly flatten the dough. Bake for 9 minutes, rotating once for even baking. Set baking sheets on a rack to cool.
4. To make the cream, place butter and shortening in a mixing bowl, and at low speed, gradually beat in the sugar and vanilla. Turn the mixer on high and beat for 2-3 minutes until filling is light and fluffy.
5. To assemble the cookies, in a pastry bag with a 1/2 inch, round tip (or a ziploc with an end cut off), pipe teaspoon-size blobs of cream into the center of one cookie (I used way more than 1 tsp per cookie!). Place another cookie, equal in size to the first, on top of the cream. Lightly press, to work the filling evenly to the outsides of the cookie. Continue this process until all the cookies have been sandwiched with cream. Dunk generously in a large glass of milk.

Monday, July 16, 2007

Challah Bread and Lentil Soup

Everybody left me! (Sobs in a corner) Nobody loves me! (Sobs in a corner)

Noone was around yesterday! I had no friends to go out and play with! The boy was on the eastern shore with family, run-girl-run had a brunch, one roommate went home and the other had work. I was all lonely (whimpers). Oh well, more time for good food!

I will write about lunch and dessert later, but I figure I should discuss the fact that I do eat real food. I eat more than the sugary creations that have dominated this page as of late. I eat...bread.

Oh I love bread. Sourdough, french, italian. Rolls, loaves, sticks. I’ll eat it all. Last night, since I had noone else around, I decided to make a slow cooked dinner that the boy wouldn’t eat. The end result was a delicious lentil soup with an even more delicious challah bread.

For the soup I used the manischewitz lentil soup mix (the one my mom always used). I tried making one from scratch a few months back and it was delicious, but I really have been craving the lentil soup my mom used to serve. This fully satisfied that craving, so next time I can go back to making it from scratch (or use the mix again since it was still very good and possibly cheaper than buying all the different ingredients separately).

The bread was a challah bread recipe I have made at least a half dozen times. It is made in my trusty bread machine, so it doesn’t have the lovely braided shape, but it is so good. And, by not braiding it, I can use it for french toast whenever I have time.
Issues or tips for next time: None! Perfect! Just follow the recipe for the challah and it will be perfect. My bread machine doesn’t have a sweet bread setting, so I used the rapid bread setting. Otherwise I always do as I am told and it pays off.
Challah -- by Dick Hanson
Ingredients -- Basic Bread Machine
3/4 cup warm water
1 large egg
3 tablespoons margarine, cut up
3 cups bread flour
4 tablespoons sugar
1 1/4 teaspoon salt
2 teaspoons active dry yeast

Directions -- Basic Bread Machine
Add water, egg, margarine, flour, sugar, salt and yeast to bread machine in order recommended by manufacturer. Select Sweet Bread cycle. Remove to rack and cool when done.
(At the begining of the bake cycle)

The site has directions on how to change it to a braided and glazed version, but unless you are serving it to company, don’t worry about it because this tastes just as good. If serving to guests and you have time, check out the changes.

Sunday, July 15, 2007

Snickerdoodles for Friends and Family

Have you ever noticed how many people have their birthdays between the end of December and the beginning of April? It seems like during that period you have a birthday party to attend every weekend, yet, come summer, there is the sparse, perhaps once a month birthday. I feel bad for the people at the end of the birthday clump, for they receive less attention, for by that point, people are bored of birthdays. I admit that I am partially guilty of this. For my group of friends born during the clump of bdays, the only ones I baked for were the boy and the roomie. That's it. Now that it's summer and celebrations are few and far between, I am baking for all the birthdays I see. First was the new room mate's at the begining of the summer (caramel chocolate chip brownies) and last night it was for the boy's room mate/my friend. For him I made snickerdoodles.

I was inspired by taste and tell's post titled "quite possibly the best cookies I have ever made." I wouldn't give them that much credit, but they were super yummy.
The recipe made 39 cookies. 39!! That's a lot of cookies!! So I made up a bag of about a dozen to give to the birthday boy, then I fed my room mates and the boy, then I took them home and gave them to the family during dinner! I still have a lot of cookies!! If we don't finish them today, I will take them to work tomorrow and either I or my coworkers will take care of the rest. Just be warned, 39 decently sized cookies (I used a small ice cream scoop to make my balls of dough, so it isn't like these are small cookies).Problems and tips for next time. Because I rolled the whole cookie in cinnamon sugar, the bottom (which also had sugar on it) became like really burnt caramel on some of the cookies. They still taste great and feel fine, but it isn't pretty. I think next time I will only put cinnamon sugar on the top and sides, but may put some into the dough to compensate for the loss of flavor. Just a tip, they are so much easier to get off the tray if you wait a minute until they cool a tad to pick them up. I tried to almost immediately use a spatula to remove a few, but quickly learned that neither the spatula nor the rush was best. Otherwise they are great cookies, will definitely make them again (would be perfect for potlucks as they are super easy and very cute and yummy).

Mrs. Sigg's Snickerdoodles
from allrecipes.com

INGREDIENTS

  • 1/2 cup butter, softened
  • 1/2 cup shortening
  • 1 1/2 cups white sugar
  • 2 eggs
  • 2 teaspoons vanilla extract
  • 2 3/4 cups all-purpose flour
  • 2 teaspoons cream of tartar
  • 1 teaspoon baking soda
  • 1/4 teaspoon salt
  • 2 tablespoons white sugar
  • 2 teaspoons ground cinnamon

DIRECTIONS

  1. Preheat oven to 400 degrees F (200 degrees C).
  2. Cream together butter, shortening, 1 1/2 cups sugar, the eggs and the vanilla. Blend in the flour, cream of tartar, soda and salt. Shape dough by rounded spoonfuls into balls.
  3. Mix the 2 tablespoons sugar and the cinnamon. Roll balls of dough in mixture. Place 2 inches apart on ungreased baking sheets.
  4. Bake 8 to 10 minutes, or until set but not too hard. Remove immediately from baking sheets. (I say wait a minute)

Friday, July 13, 2007

Appreciation

This is my first post related to work. Though it isn’t so much about the law, it is about the interactions between staff members in a law group. Yesterday I was doing a spreadsheet of witnesses for one of the paralegals, then she came over with something for another case that she said she needed done by the end of the day. I told her that I couldn’t finish both of them, which was more crucial, and she said the new project. So I did the new project so that she could assign jobs to FBI agents she was meeting with the next day, and I made it look very pretty and organized with heading pages and all. I gave it back to her in the early afternoon and she was so appreciative. I then went to work on another job for a legal assistant, and the paralegal came over to my desk with a bouquet of flowers. She said she really appreciated all my help and could not have done it without me and all this really sweet stuff. From now on, if that paralegal asks me to do anything for her, it will be done before anything else. It is nice to know that someone sees the good you are doing and how much work you put in. Many of the attorneys do not act in such a manor, so if their copy jobs get pushed until the next day, or if there is a typo on their document, the assistants do not go the extra mile to help, because they know it will go without a thank you. Lesson of the day: Treat others as you would want to be treated. Show how much you appreciate someone’s help or kindness. I will keep this in mind for when I have an assistant, clerk or paralegal. Their job may require less education, but it is not necessarily easy; there is work and a simple thank you is enough motivation to do the work very well.

Speaking of appreciation, I would like to let you guys know that I appreciate you sticking with me and reading my thoughts as I get this blog up and running. It may not be as pretty or full as other cooking blogs, but I think I can make it worth checking out. Using sitemeter I have come to realize that more people than just my friend run-girl-run are reading this. And I appreciate it. You could read the cooking thoughts of anyone from around the world, and some of you have chosen to read my blog many times. THANK YOU! You make me all warm and fuzzy. Please, leave comments, I’d love to see if you guys have blogs so I can return the favor and check out what you guys are whipping up in your homes. I hope to keep this blog in a condition that you can continue to enjoy it (including the recipes).

Ok, enough sap and work stories, back to food. Last night I made chicken stirfry. I am not putting up pictures or a recipe because I cheat. All my Asian friends hate me and call me inauthentic because (gasp) I use a packet of stirfry sauce mix. I know, everyone has told me, I can make a sauce on my own. But it never comes out quite the way I want it, and honestly, I have never been too thrilled with the flavorings on my friends’ stirfries. Why should I change to be more authentic if authentic isn’t yummy? I’ve had authentic, and I still want the Sun Bird stirfry sauce packet! (Do you think I can get free products for that? Lol). Anyway, to avoid ridicule I won’t post pictures of it, but it tasted great as always.

I had meant to bake homemade oreo cookies as posted on smitten kitchen’s site (I was going to give some to a friend for his birthday and either eat the rest myself or bring them to work depending on my mood), but I didn’t have time before we left to go out. You see it was the guy’s 21st bday, so we went to Adams Morgan so he could enjoy his adulthood with a few drinks. If we don’t go out tonight I will be making cookies and will have the report up soon. Enjoy your weekends and check back soon for a REAL food blog!

Thursday, July 12, 2007

Vegetarian Baked Ziti

To understand why this recipe is so amusing, it is important to know a little about me. If you aren’t interested in me and my story, skip down to the recipe, it is definitely worth a try!

Anyway, the story behind this recipe. As alluded to in the post about bagels, I have a Jew side and Goy side. My mom was raised mostly kosher and my dad went to Catholic school to give you an idea what I am talking about. I never celebrated the very religious holidays from either side, just doing the present giving holidays (Christmas and Chanukah). One year, one of my Catholic friends decided to go vegetarian for Lent. Despite the fact that I don’t do religious holidays, I decided to try it with her because I always toyed with going veg, so this would give me 40 days to try it out and support her at the same time. For the most part I didn’t miss beef. I hated my lack of chicken, but beef I could do without. Except in one dish. My mom’s baked ziti. Oh did I miss baked ziti. Mom always made it with ground beef sautéed with onions, and great tomato garlic pasta sauce surrounding noodles and cheese. It doesn’t get more comforting than that. My mom’s baked ziti was the epitome of comfort food. And so during those 40 days (and 40 nights) I hated my lack of baked ziti. My mom’s first response (as a Jew who didn’t really understand vegetarianism or Lent) was “if you want it so bad, just eat it!” No, by this point I was also proving something to myself (besides supporting my friend and doing something good for animals, the earth and my health). Then a friend of the family suggested broccoli instead of meat. It was an odd idea, but we thought we’d give it a try. I have never looked back. I changed the recipe slightly to accommodate the broccoli and make it quicker, but it is even more associated with comfort food now than it was back in the days of ground beef. You can of course switch back to the meat, but this version is healthier and just as fulfilling.

Vegetarian Baked Ziti
1 lb box of ziti or rigatoni pasta
1 jar of your favorite pasta sauce (I like ones with chunks of tomato and onion)
1 8oz bag of shredded mozzarella or mixed Italian cheeses
1 box frozen chopped broccoli
Optional: basil, Italian seasoning, chopped tomatoes, onion or garlic

1) Put a pot of water on to boil. Meanwhile remove broccoli from the box, put in a bowl and microwave for 1 min. After a minute, take the broccoli out, drain out whatever water you can and break the pieces of ice a little, then microwave another minute. Drain well. If it still has a bit of ice, microwave a little longer, but (very important) do NOT actually cook the broccoli. You don’t want it warm, just thawed. Once it is thawed, drop broccoli into a colander and drain. Using your hands, push ALL the water out of the broccoli. Excess water leads to soggy ziti, and you don’t want that. 2) By this time your water should have started to boil. Preheat the oven to 350F. Cook your pasta for about a minute less than you would if you were just going to eat it. You want it to hold its shape and not overcook in the oven, but you also don’t want it hard, so about a minute before you would eat the pasta plain is when you want to drain it.
3) While the pasta cooks, take a big, deep oven safe bowl (ceramic or glass have both worked for me) and pour all but about a cup of the pasta sauce in. add all but ½ a cup of the cheese. Add the tomatoes, onion and/or garlic if you are using it. Add the drained broccoli and stir to combine.
4) When the pasta is done, drain it and pour on top of the sauce mixture. Pour most of the leftover sauce on top (leave a few spoonfuls though). Stir it all together gently to avoid breaking the pasta (the sauce on top and bottom helps it mix more smoothly, making less breakage).
5) Once mixed, top with remaining few spoonfuls of sauce, basil or seasonings if you are adding them, then the leftover cheese. 6) Cover with lid or aluminum foil and bake 20 minutes. Remove lid or foil and bake another 15-25 minutes depending on how crunchy you like your top pieces (I like the top pieces very crunchy, as does my room mate, so we stick close to 25. Last night I was hungry so I didn’t wait as long, so, as you will see in the pictures, the top was not very crisp)So simple and so delicious. I probably make this dish once a week. I have not met a single person yet who didn’t like this dish. It does take a while but there are so few ingredients and so little effort that it is worth every minute. Seems so impressive that you can serve it to a group, but if you just have a few people, make just as much because the leftovers are great too. Depending on everyone’s hunger, this makes anywhere from 3-5 servings.
This baked ziti is my first entry into Presto Pasta Nights. Oh man, looking at past pasta entries just makes me want to drool...and then become Italian. Can you adopt a culture? If so, these pasta recipes on other blogs make me want to be Italian, without a doubt! Check them out and try not to bite the screen!